Berry Oat Bars: The Sweet Secret To All-Day Energy
Look, I get it. You want something sweet. Something you can grab at 3 PM when your energy crashes and the vending machine starts whispering your name. But most ‘healthy’ snack bars? Total frauds. They’re just candy in disguise—loaded with sugar, weird preservatives, and enough guilt to ruin your mood.
That’s why I started making these Berry Oat Bars. They’re my rebellion against sad, overpriced ‘health’ snacks. Think chewy oats, bursts of tart berries, and just enough honey to make you forget they’re actually good for you. No lies, no gimmicks—just real food that keeps you full (and sane) between meals.
Here’s the truth:
- They take 10 minutes to mix up.
- You probably have all the ingredients right now.
- They freeze like a dream, so you’re never stuck hangry again.
Make them once, and I swear—you’ll never waste money on those cardboard-tasting store bars again.
Table of Contents
Why You’ll Love These Berry Oat Bars
Let’s be honest—most homemade snack bars either taste like sweetened cardboard or crumble into sad little piles. Not these. Here’s why these Berry Oat Bars became my ride-or-die snack (and why you’ll be obsessed too):
1. They Actually Taste Good (Shocking, I Know)
No weird aftertaste, no choking-on-dry-oats situation. The combo of tart berries + toasty oats + warm honey hits that perfect sweet spot between healthy and “wait, this is good for me?” Pro tip: Underbake them slightly for that irresistible chewy texture.
2. You Can Eat Them Any Damn Time
Breakfast? Throw one in your bag with a banana. Post-workout? Perfect with a protein shake. Midnight snack? Zero judgment. They’re like the Swiss Army knife of snacks—always there when you need them.
3. Customizable AF
- Berry hater? Swap in mashed banana + dark chocolate chips.
- Vegan? Maple syrup works just as well as honey.
- Extra hungry? Smear with almond butter before devouring.
4. They Won’t Crumble Into Your Keyboard
Unlike some cough store-bought bars, these hold their shape. I’ve thrown them in purses, gym bags, and even a toddler’s sticky hands—they survive.
5. They Make You Feel Like a Grown-Up
Because honestly? Adulting is hard. But pulling out a homemade snack you actually want to eat? That’s a small victory.
Equipment You’ll Need (No Fancy Gadgets, Promise)
Let’s keep this simple—you don’t need a Pinterest-worthy kitchen to make these bars. Here’s the bare-bones list:
- One Bowl (The Messier, The Better)
- Use whatever mixing bowl you’ve got. I’ve made these in a saucepan when my bowls were all dirty. No shame.
- Baking Pan (8×8” or Whatever’s Clean)
- Pro tip: Crumple the parchment paper first—it’ll actually stay put when you press in the sticky oat mixture.
- Your Hands (The Ultimate Tool)
- Forget fancy spatulas. Just wash your hands and press the mixture into the pan like you’re mad at it. Works every time.
- A Fork (For “Fancy” Mixing)
- Whisk? Nah. Just stab the ingredients together like you’re punishing them for existing.
- Knife (To Cut Them Into Squares… or Just Bite Straight From the Pan)
- Let’s be real: You’ll “test” at least two pieces before they’re fully cooled. I support this.
Bonus “Hack”:
If you don’t have parchment paper, grease the pan with butter or coconut oil. It’ll stick a little, but that’s what spatulas (or your fingers) are for.
Ingredients You’ll Need (And Why They Matter)
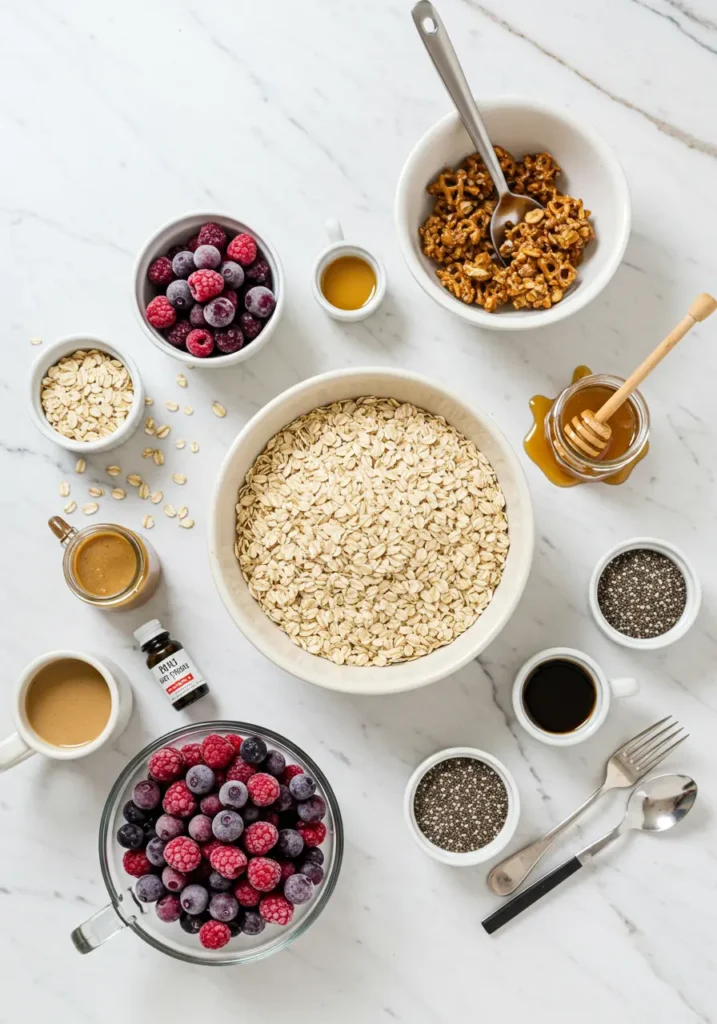
Listen, I’m not one of those recipe writers who’ll shame you for using frozen berries or store-brand oats. Here’s the real deal on what you need and why:
The Non-Negotiables:
- Old-fashioned oats – Not quick oats (they turn to mush) or steel-cut (too crunchy). The regular kind gives that perfect chewy texture.
- Mixed berries – Fresh, frozen, whatever’s on sale. I’ve used the “mystery berry blend” from the freezer aisle and lived to tell the tale.
- Honey – The cheap stuff works fine. This isn’t a gourmet honey tasting, we’re making snack bars.
The Supporting Cast:
- Nut butter – Almond, peanut, whatever you’ve got. Even the last scrape of the jar works.
- Chia seeds – Optional but great for texture. If you don’t have any, no big deal.
- Vanilla extract – The imitation kind is fine. Your grandma used it and her baking was legendary.
Pro Tips from My Many Kitchen Disasters:
- If your berries are frozen, microwave them for 30 seconds first – saves your hands from turning blue when mashing.
- Out of honey? Maple syrup or even brown sugar + water works in a pinch.
- Forgot to buy nuts? Crushed pretzels add a salty crunch that’s weirdly amazing.
The Best Part: Every ingredient here can be eyeballed. No measuring spoons? Use that coffee mug you’ve been meaning to wash.
Step-by-Step Instructions (With Zero Pretentious Chef Talk)

Alright, let’s make some damn bars. I’ve burned, undercooked, and crumbled enough batches to know exactly what works:
1. Preheat Like You Mean It
- Crank that oven to 350°F (175°C). No fancy convection setting needed.
- While it heats up, line your pan with parchment paper or just grease it with butter like our grandparents did.
2. The “Dump and Stir” Method
- In your least-favorite mixing bowl (this will get sticky):
- Dump in 2 cups oats
- Add your mashed berries (about 1 cup)
- Plop in 1/2 cup nut butter
- Squeeze in 1/4 cup honey
- Sprinkle any extras (chia seeds, cinnamon, etc.)
3. Get Your Hands Dirty
- Forget utensils – dig in with clean hands and squish everything together until it looks like purple-ish playdough.
- Pro tip: If it’s too dry, add more honey 1 tbsp at a time. Too wet? More oats.
4. Pan It Like a Pro
- Dump your sticky mess into the pan.
- Press down HARD with your palms – we’re talking “taking out your daily frustrations” level of pressure.
- Smooth the top with a spoon (or just lick your fingers and pat it down).
5. Bake Until “Good Enough”
- 20-25 minutes. They’re done when:
- The edges look slightly golden
- Your kitchen smells amazing
- You can’t wait any longer
6. The Hardest Part: Waiting
- Let cool COMPLETELY before cutting (about 1 hour).
- If you cheat and cut early, they’ll crumble… but you’ll still eat the pieces anyway.
Troubleshooting:
- “Mine fell apart!” → Didn’t press hard enough or didn’t cool completely
- “Too dry!” → More honey next time
- “Burnt the edges!” → Your oven runs hot – try 325°F next batch
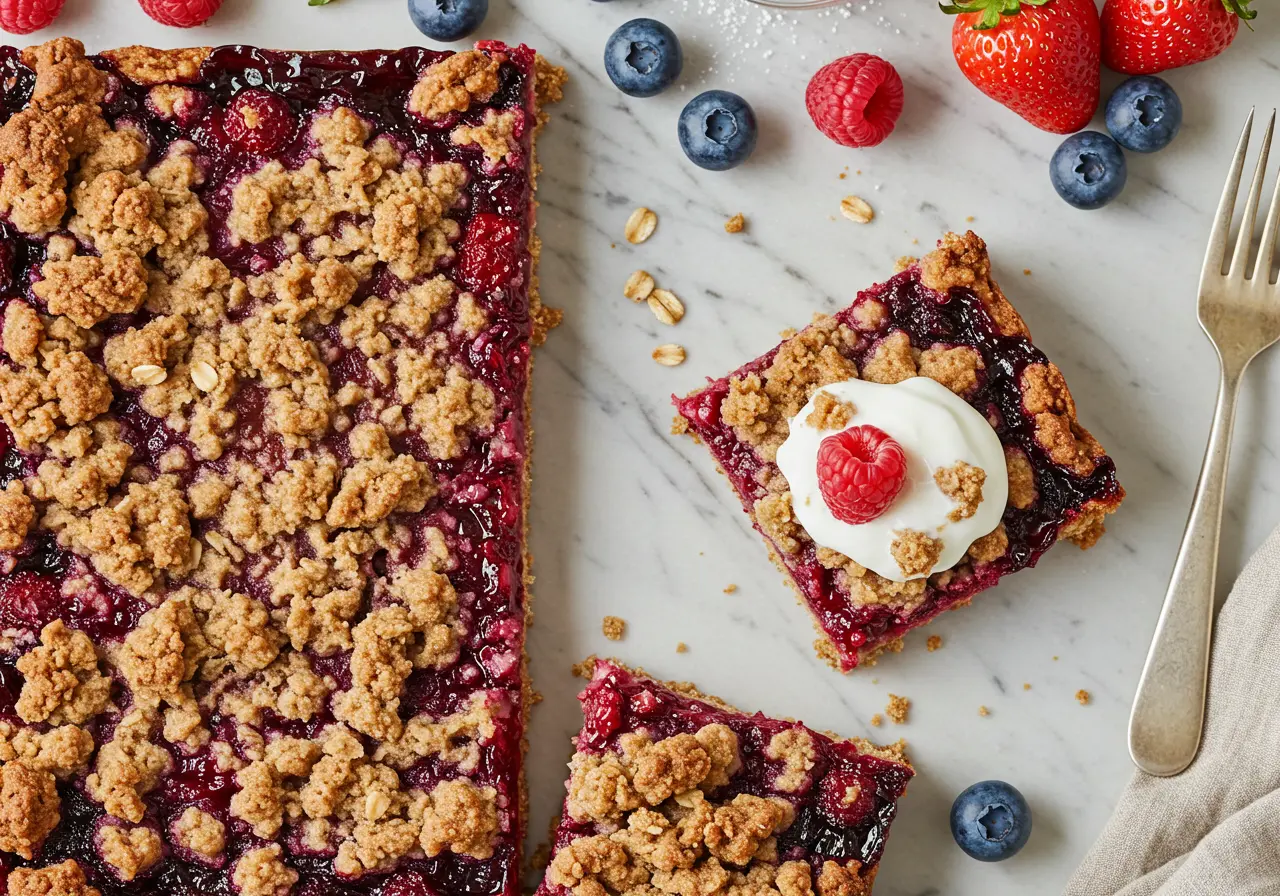
Serving Suggestions (Because We’re Fancy Like That)
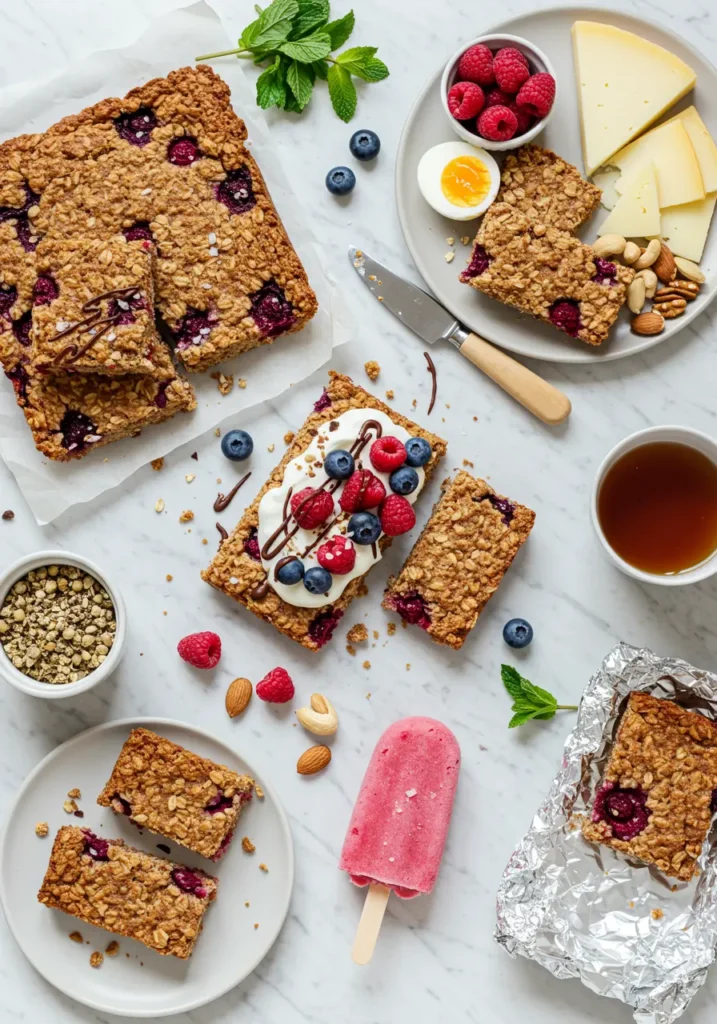
Look, these bars are damn good straight out of the pan with your bare hands. But if you want to pretend you’re on a wellness influencer’s Instagram for five minutes, here are some ideas:
For the “I Adulted Today” Moment:
- Warm one up for 10 seconds and top with Greek yogurt + extra berries
- Drizzle with melted dark chocolate (because antioxidants)
- Sprinkle with flaky sea salt to feel ~artisanal~
For the “I’m Running Late Again” Breakfast:
- Crumble one over oatmeal (bar-ception!)
- Pair with hardboiled eggs for sweet/savory balance
- Wrap in foil and eat on the bus like a breakfast burrito
For the “I Deserve Nice Things” Snack:
- Serve with chamomile tea when stress-eating
- Plate with cheese and nuts for bougie snack board vibes
- Stick a popsicle stick in it and call it a “berry oat pop” (kids love this trick)
Pro Tip: Cut them into different shapes depending on your mood:
- Squares for meal prep
- Triangles when you’re feeling fancy
- One giant rectangle when you’re eating feelings
How to Store Leftovers (If You Somehow Have Any)
These bars tend to vanish faster than your motivation to meal prep. But if you manage to save some, here’s how to keep them fresh:
Countertop (For Immediate Gratification)
- 2-3 days in an airtight container (or just cover the pan with foil if you’re lazy).
- Tip: Hide them behind the bananas. No one looks there.
Fridge (For “I’ll Save You For Later” Lies)
- 1 week in a sealed container.
- Pro Move: Layer with parchment paper so they don’t stick together.
Freezer (For Future You to Discover Like a Treasure)
- 2 months in a freezer bag.
- Hack: Freeze them individually on a tray first, then bag—no stuck-together bar bricks.
- Eating Frozen? Let them thaw for 10 minutes, or microwave for 15 seconds if you’re impatient.
Reheating Notes:
- Microwave: 10-15 seconds for that “fresh-baked” feel.
- Air Fryer: 2-3 minutes at 300°F if you want crispy edges.
- Straight from Freezer: Perfect for summer—like an oat-y berry popsicle.
Recipe Variations (Because Boredom is the Enemy of Healthy Eating)
Let’s face it—even the best snack gets old after a while. Here’s how to keep these bars exciting without actually doing extra work:
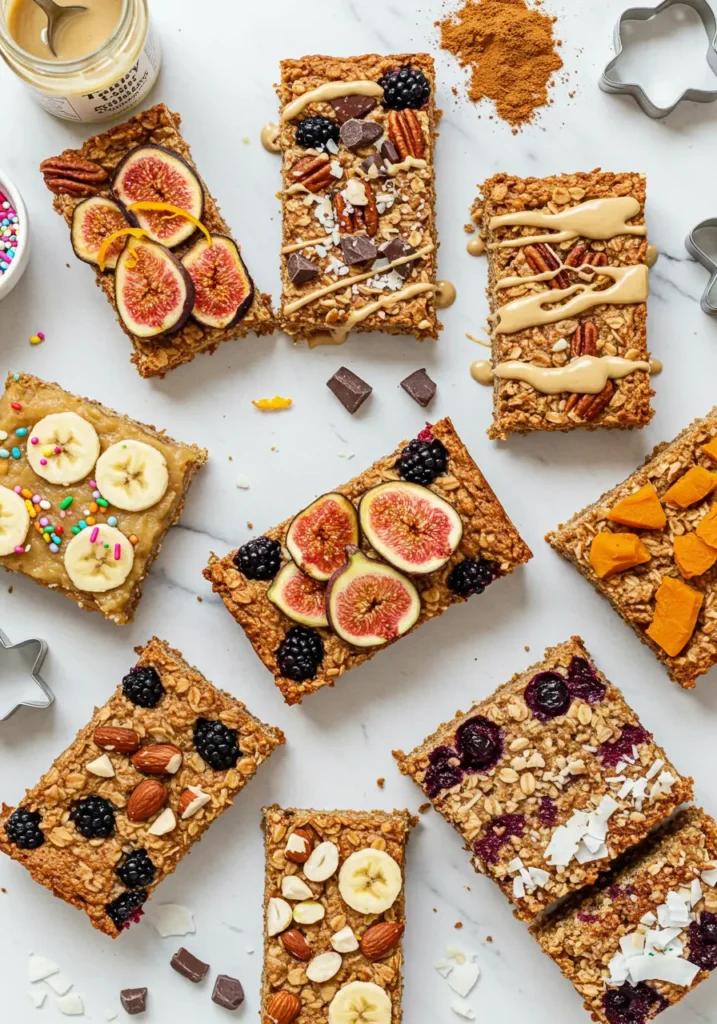
1. The “I’m Fancy Now” Upgrade
- Swap berries for sliced figs + orange zest
- Add chopped dark chocolate (because antioxidants, obviously)
- Top with a drizzle of tahini + flaky salt post-bake
2. The “Where’s the Protein?” Version
- Stir in a scoop of vanilla protein powder (add an extra tbsp honey)
- Use peanut butter instead of almond butter for more oomph
- Press whole almonds into the top before baking
3. The “Oops, I’m Out of Berries” Fix
- Mashed banana + cinnamon (hello, breakfast vibes)
- Applesauce + chopped dried apricots (chewy texture win)
- Pumpkin puree + pumpkin spice (basic, but we stan)
4. The “My Kid Won’t Eat Anything Beige” Edit
- Add rainbow sprinkles to the mix
- Cut into fun shapes with cookie cutters
- Call them “superhero energy squares” (marketing works)
5. The “I’m Not Sharing” Batch
- Bake in a loaf pan for THICC bars
- Add espresso powder for a caffeine kick
- Mix in shredded coconut for tropical vibes
Nutritional Benefits (AKA Why These Bars Are Basically a Superfood)
Let’s cut through the wellness noise—these bars aren’t just less bad for you, they’re actually packing some legit health perks. Here’s what’s working overtime in every bite:
1. Oats: The Unsung Hero
- Fiber bomb: Keeps you full and keeps things… moving.
- Slow-release carbs: No 3PM energy crash.
- Bonus: Contains beta-glucans (fancy word for cholesterol helper).
2. Berries: Nature’s Candy
- Antioxidant overload: Fights inflammation like tiny fruit ninjas.
- Low sugar: Compared to other fruits, these won’t spike your blood sugar.
- Pro tip: Frozen berries actually have more nutrients than off-season fresh.
3. Nut Butter: The Glue That Holds Life Together
- Healthy fats: Keeps your brain and hormones happy.
- Plant protein: About 4g per serving just from this.
- Secret weapon: Makes everything taste richer without butter.
4. Honey: The Not-So-Guilty Sweetener
- Natural prebiotic: Feeds your gut bacteria.
- Trace minerals: Like zinc and iron (more than white sugar’s zero).
- Flavor hack: Caramelizes when baked for that gourmet touch.
Compared to Store-Bought Bars:
| These Bars | Fancy Protein Bar | |
|---|---|---|
| Sugar | 8g natural | 12g added |
| Fiber | 5g | 2g |
| Ingredients | 6 real foods | 27 unpronounceables |
FAQ (All the Dumb Questions You Were Too Embarrassed to Ask)
Let’s address the real-talk questions before you accidentally create kitchen chaos:
1. “Can I use instant oats instead?”
Sure, but the texture will be mushier—like oatmeal in bar form. If that’s your vibe, go for it.
2. “My bars fell apart—did I fail at life?”
Nope. Just crumble them over yogurt and call it a “deconstructed parfait.” ~Fancy~. Or add more nut butter next time.
3. “Can I use jam instead of fresh berries?”
Technically yes, but it’ll be sweet sweet. Reduce the honey if you do this, or you’ll enter candy territory.
4. “Why isn’t mine as pretty as your photos?”
Because food styling is a lie. Mine look like lumpy rectangles in real life too. Taste > Instagram aesthetics.
5. “Can my dog eat these?”
NO. Honey + potential xylitol in nut butters = bad for pups. Make them peanut butter dog treats instead.
6. “Help—I forgot to grease the pan!”
Channel your inner raccoon and scrape it out with a fork. It’ll taste the same, just… rustic.
7. “Can I make these without baking?”
Yes! Press into bars and refrigerate for 2+ hours. They’ll be denser but still delicious.
Conclusion: Berry Oat Bars – Your New Go-To Snack
At the end of the day, these bars solve three universal problems:
- They’re faster than Uber Eats (20 minutes vs. 40+ minutes of regret)
- They’re cheaper than store-bought “health” bars (pennies per serving vs. $3 per sad cardboard rectangle)
- They actually make you feel good (no sugar crashes, no mystery ingredients)
So whether you’re meal-prepping for the week, packing lunches, or just need something to throw at your hangry self at 4PM, these bars have your back.
Final Pro Tip:
Double the batch. Freeze half. Thank yourself later when cravings strike.
Experiment and try a weird variation and report back. Worst case? You get crumbles for yogurt topping.
- Tag me on Instagram when you make them—I want to see your lumpy-but-lovely creations!
- Save this recipe (because we both know you’ll forget where you saved it otherwise)